Friday, September 12, 2014

How to add pin-it button for image sharing on each images for wordpress

Social media for image is best internet marketing for website/blog. Now point is that how to make easy it, to share images from wordpress on pin-it.

You can add pin-it button at top right corner on all images which is in your post, article, and pages.

For visitors, easiest way is to share images on pinterest using layered pin-it button.

Why pinterest is useful for wordpress images sharing – add pin-it button

From there you will get millions of images in single roof. You can share own images over worldwide in single click. More over the European counties people always prefer pinterest as a best image sharing way. From the pinterest you will get high resolution finest images on each topic and word.

Useful: Best social networking sites for SEO and online marketing.

Apart from the pinterest, you can also share your images on other images sharing alternative sites.

You can use direct plugin for pin-it button on image, jQuery Pin it Button for image, Pinterest Pin It Button For Images.

Steps to add pin-it button on image for wordpress image

Step 1

You can choose any of one pin-it plugin given in below,

jQuery Pin it Button for image,
Pinterest Pin It Button For Images (Personally used this)
Then install it in your wordpress dashboard directly, Get more idea on plugins installation guide.
Add Pin-It Button plugin for wordpress

Step 2

After choosing best pin-it image plugins for wordpress, install it in your website.
Activate installed Pin-It plugins
Step 3

After successfully installed, Small setting have gives in below image and save it.
Activate installed Pin-It plugins

Pin-It pinterest plugin setting
Select Option To display Pin-it button on image

Now you can check in your wordpress website/blog, All images on your screen contains pinterest pin-it button.

You have any suggestion than comment in below, we will be glad to assist you. Don’t miss to read our article on Domain suggestion, wordpress, and installation guide.

Conclusion: Pinterest is in list of best social networking site to get visitors and traffic in short time. From this post you can make sharing your post using images is so easy, with pin button on each images of your article. So add pin-it button in your wordpress blog/website, and share experience on valuable result in below comment.

Tuesday, September 9, 2014

How to create Wikipedia eBook from Wikipedia page [Official]

Wikipedia is #1 side over word to get perfect definition in details. Millions of users are actively visit in a day over worldwide. Wikipedia is available in all languages have plus point. Wikipedia is one kind on search engine to get knowledge in deep. So student, younger and old age try to make note from Wikipedia. Wikipedia give official option to make eBook of whole page in whole contents. For that you don’t need savvy knowledge on internet or more. Here in these steps I giving guide on how to make or create Wikipedia e book or PDF file from Wikipedia page. So let’s start to create book from Wikipedia.

Useful also: Best ebook downloader websites for all.

Steps to create PDF or eBook from Wikipedia directly

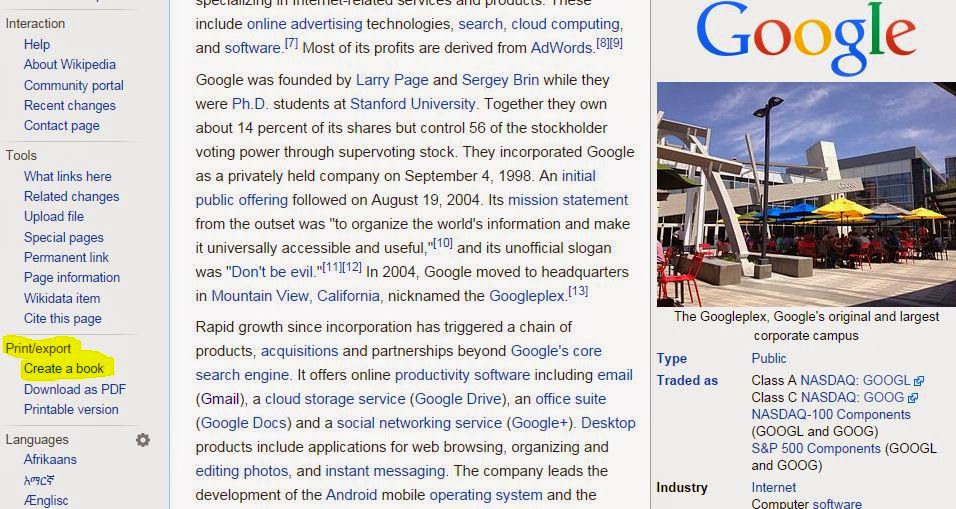
Through below four steps you can create/Make PDF or eBook from Wikipedia page. First open your topic in Wikipedia official site and go processed with below steps. in this example I want to make PDF or eBook about on “Google”.

Step 1: my Wikipedia line should be this : https://en.wikipedia.org/wiki/Google.

You can convert in your own language from left bar options. There you will also gins option for import and export data I the form of PDF or eBook.

Step 2: Under the Print/Export > Create a book.
Create a book of wikipedia page directly
After click on it, Book create option on your page.
Press Wikipedia book creator button
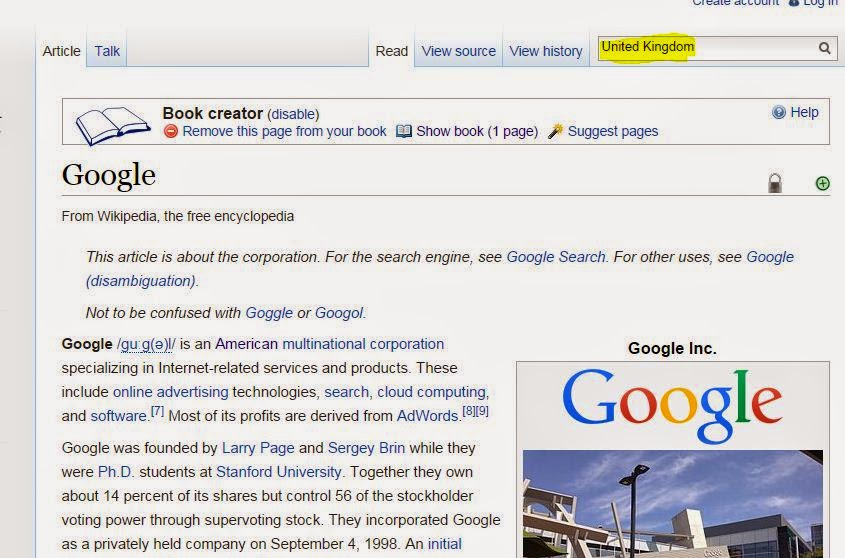
After clicked on Start book creator button, Now you can collect book pages as of your need. To add pages tap on “Add this page to your book” option. You can remove by tap “Remove this page from your book”.

You can add book page one by one. You can see page number from there also. Here I added Google page in my book.

Add more page in Wikipedia eBook
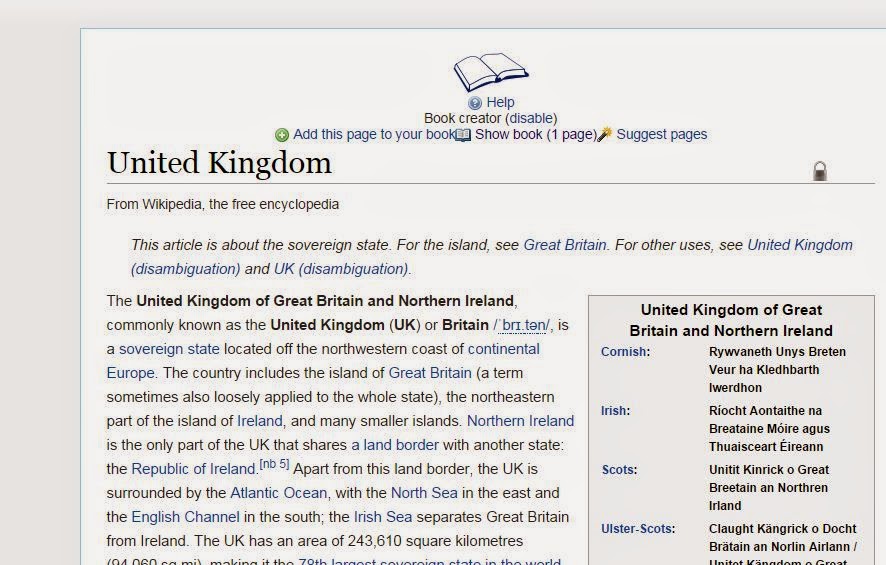
Search “united kingdom”, and add if you want to add
Add more page in Wikipedia eBook
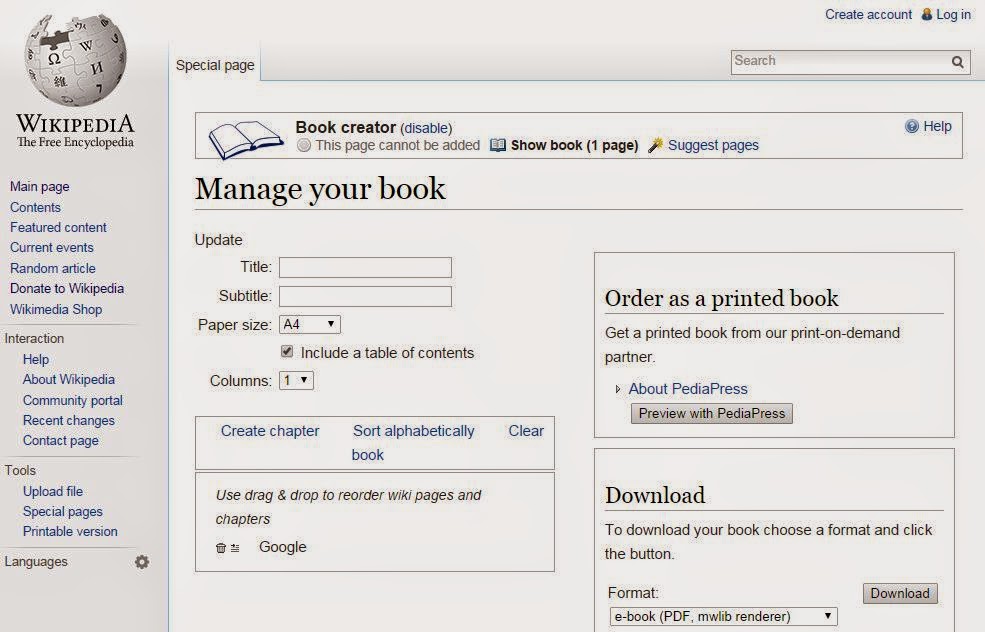
Step 3: after add all pages one by one, Tap on Show book link.

add another page in wikipedia
Manage book from wikipedia pages
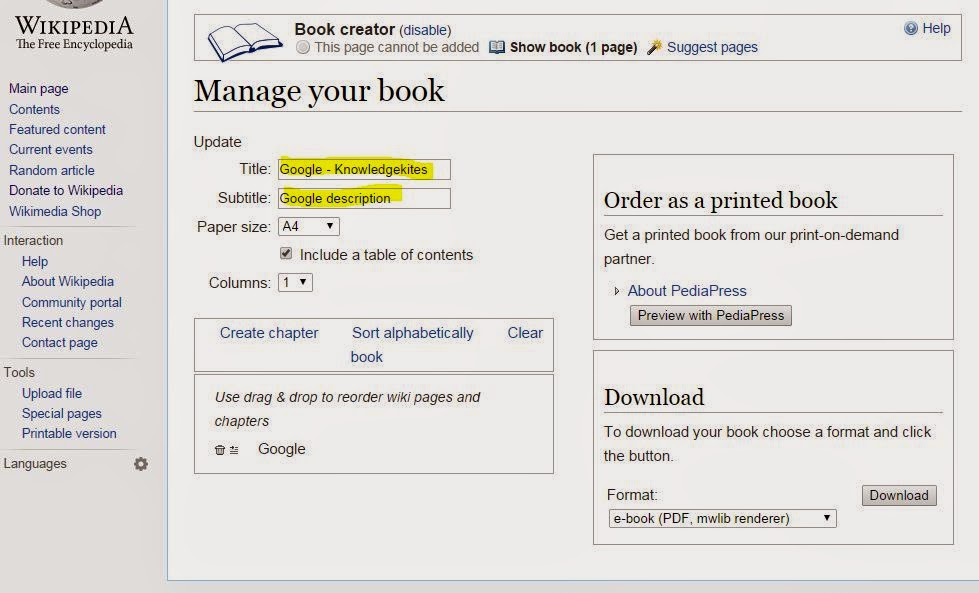
Give wikipedia eBook title and description
Fill all the details that want you give, You can also manage all pages with given option there.
To check preview Tap on “Preview with Pediapress” or to download in your PC click on “Download” button.
You can download now
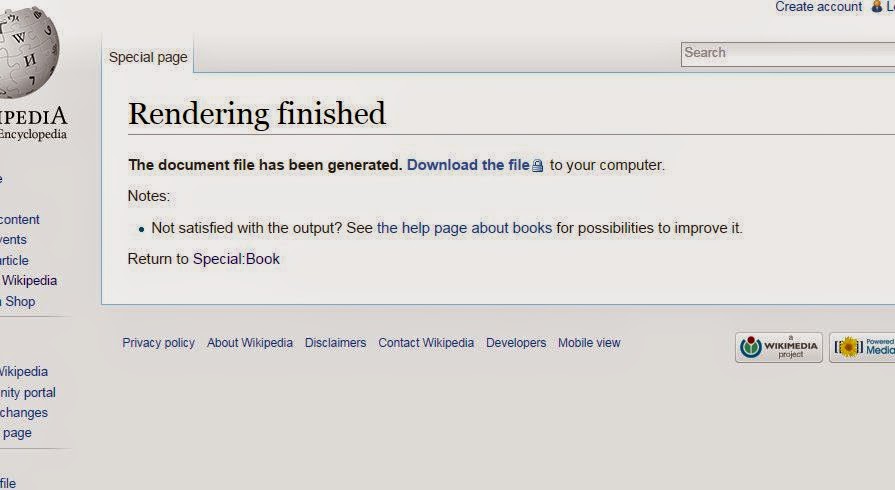
Wikipedia eBook prepare for download


Right click on Download the file, and save it in your PC or Mac.

Have you any problem to create PDF file or eBook from Wikipedia pages, so comment in below. This post is very useful and informative so like and share it, and also helps someone, kindly.

Saturday, September 6, 2014

How to use Squirrly Plugins in wordpress: Check SEO of article online

Use Squirrly plugins in WordPress, is the best experience on SEO plugins use. To check your WordPress article or post rank at publishing time. You can customize your post using HitTail and Long-Tail keywords. SEO check all the points like human friendly, Google friendly, content quality, Keyword Popularity. After use Squirrly you can get a perfect combination of all above criteria. To archive more indexes in Google and other top search engines you must use Squirrly SEO (Search Engine Optimization).

Here I will try on “How to use Squirrly SEO from your hosted WordPress dashboard”. For the newbie this tips is very useful. Because more over blog guide on best SEO plugins, Installation guide act. So none of giving guide on how to use Squirrly plugin in WordPress website/blog.

Squirrly SEO plugins for wordpress How to use it

Useful: Check the entire useful installation guide for hosted WordPress website/blog.

So, let’s watch popularity of Squirrly Plugins and use guide in below,

Popularity of Squirrly plugins

This number is noted on 24 June 24, 2014. Will be update in future.

Squirrly gives regular update with WordPress new update.

Recent WordPress supporting version is 3.3 To 3.9.1

Updated on one day ago,

Total download: 504, 559

From Download number of Squirrly plugin, you can get idea of success of Squirrly plugin as compare to other SEO plugins.

Step to use Squirrly plugins in WordPress


After writing or before posting you must choose keyword from your blog post. After choosing keyword, you can check how much valid keyword for my article post. To make 100% optimized article you have follow the below simple steps.

Squirrly also giving premium service, you can buy it from here

Step 1

Install SEO Plugin by SQUIRRLY in your WordPress dashboard. More information click here

Useful: How to install WordPress plugin?: Best installation ways of wordpress plugin

Step 2

Add Single (one) Keyword in below box, which is main keyword of your post/article in WordPress website/blog.

Squirrly SEO plugin - Use guide

And fulfill the entire requirement for 100% optimize your blog/website article. Squirrly check SEO for both human and server friendly.

Follow the all the points Step by Step, given in below make it all green.

Squirrly SEO points - Make use of Squirrly in wordpress

All tabs are greens means you has archive best optimized article. See in below image,

Conclusion: Use Squirrly Plugins, gives more benefits in short time with fewer efforts. Don’t miss to share experience on Squirrly SEO for WordPress in below comment box. All the best for make use of Squirrly Plugins.

Thursday, September 4, 2014

How to install FeedBurner Email subscription plugin setup for wordpress

FeedBurner email subscription for WordPress must increase traffic in your web. So install email subscriber plugin in first step of wordpress installation. In WordPress it is so easy, you are not belonging from technical field but you can do using below simple Email Subscriber installation guide. For email subscription FD FeedBurner is very handy and success for WordPress. After installed this plugin, you can see email submission widget on WordPress blog/website.

Why we use Email Subscription: Feed burner email Subscriber

Using this tool, all registered users can get daily updates in Email inbox. Using this free email service you can get lot a visitors and Pageviews on new updates. Using analysis in feed burner you can check daily reached people and subscriber from chart. Date filter is the best option to track daily, Monthly analysis.

Benefits of FeedBurner Email Subscription


  • From the user’s reviews and feedback on feed burner,
  • You can set daily visitors for your blog and website.
  • Increase traffic in double and triple in short of time
  • Get direct visitors from mail inbox.

Steps to install FeedBurner for WordPress: FB FeedBurner WordPress Plugins

Step 1

FeedBurner is free service powered by google, to use this service you have gmail login.

Go, FeedBurner email subscription service page, and login with Gmail Username and password.

Your Custom feed URL must be : Your Website domain name + feed

Ex, http://www.Yourdomainame.com/feed

Now your screen looks like in below,

Add your feed address in text box,

Submit Your Wordpress Website-Blog address with feed


Step 2

Now in second step give impressive Title and feed address.

Title: it will be show in your subscriber’s inbox.

Feed Address: Easy to remember always give your website URL name,.

FD FeedBurner Email Subscription
Add Your Feed Title and Feed address
Click on next

Step 3

Now you main part of create feed burner address is finished. Now click on next as of your requirement as of you.

Here giving all the step in below,

options in feedburner feed submission

Add FeedBurner Setup from wordpress dashboard
Select Wordpress As Hosting platform for your Blog-Website
Copy Your Blog or Website's Feed Address

Step 4

Now in this step you will learn how to integrate feedburner from your wordpress, At first you have to install FD FeedBurner plugin.

Useful: How to install WordPress plugin in WordPress - All Alternate ways

Install FD feedburner Plugin in Wordpres DashBoard

FD FeedBurner has more advance features as compare to others. After installed in your wordpress dashboard.

Open FeedBurner page, Settings > FeedBurner
Open FD FeedButner installed Plugin
Add your wordpress website feed in Redirect my Feed here fields,

Add Feed Address in Your FD FeedButner installed Plugin

Now you are done. Wish you all the best for more traffic and direct visit.

You have any problem than comment in below. We will be happy to assist you.

Conclusion: FeedBurner Email Subscription installation process is very easy for beginners also. So don’t fear and follow the basic FeedBurner installation step give in this FeedBurner tutorial.

Wednesday, September 3, 2014

How to change billing address in T – Mobile [Step by Step]

T – Mobile giving different methods to change billing address of T – Mobile. What’s your customer type and what your account type is, are you able to change your billing address or note. From this post you can get the whole idea on how to change T - Mobile address legally and correct way.

Note: if you shifted your residence address through the United States Postal Service (USPS). That doesn’t have to do on change or update your T- Mobile billing address. USPS automatically query to the T- Mobile service for change address. If you cant do in this way then you must have to follow the below steps carefully.

Useful: Check T - mobile usage from your mobile.

Here are the steps for change or update T- Mobile billing address

Your T- Mobile customer plan should be Primary account holder.
Step 1: Go to the login T –Mobile account.
Step 2: From the top navigation menu, Tap on profile option.
Step 3: Under the profile, Tap on Billing and payment option
Step 4: from this page you have to change your billing address with new one by click on edit option.
Step 5: submit all the correct information, choose the address e911 for all phone lines.
Change or update T- Mobile address

Note: E991 number address is emergency code number to get any time contact with you.

Step 6: Tap on Save, Now you are done,

How to pay bill in T- Mobile, with number of paying mode?

You have successfully update or change your T – Mobile address with new one. Are you getting some problem and confusion comment in below. We will be glad to assist you.

Tuesday, September 2, 2014

How to pay T – Mobile by online, Mobile, and other methods – Step by Step

T- Mobile users always finding way to pay online and how to pay T – Mobile bill in different way, You may not to know alternate way of pay bill in different mode. T – Mobile payment paying services are online, over the phone, though Easy pay, through check or money order, from EIP balance, at T – Mobile store. In below you can find all steps according your T – Mobile payment process.
T- Mobile bill pay options -  How to pay bill in T - Mobile
T- Mobile bill pay options -  How to pay bill in T - Mobile

Note: These payment ways are officially declared you can check it here.

Ways to pay T – Mobile bill : Online, offline

Do T – Mobile payment officially online

Step 1: Go to the T – Mobile and login with T – Mobile number and password.
Step 2: Inside your T – Mobile dashboard, Tap on billing.
Step 3: Then tap on Pay Bill option, To pay recent bill amount before due date.

Enter the valid card details and precede it with easy steps, T – Mobile giving very useful option to save you payment details for future use, for future bill payment you don’t need to enter card details again and again.

Note: you can’t do payment in T – Mobile with Credit card and international zip card.

Pay through the your Phone/Mobile

This payment operation takes fixed service charge amount ($5).
You can do payment using phone by dialing 666 or call on 1 – 877 – 746 – 0909.
This service available for all time in day or week
Or
You can also pay with customer executive help service. That can be available 6 a. m. to 10 p. m. on all 7 days in week.

T – Mobile bill pay through the Easy Pay

In this payment process, you can pay bill through the E – Check, ATM card, Debit card, Credit card.
Login T –Mobile, Go To the Billing > Easy pay status > Sign up > summit all fields to pay with Easy Pay.
Note: you can also stop Easy Pay any time through the same process. For that you have to set option “Stop EasyPay”.
More info on T - Mobile on Easy Pay Click here

Pay T – Mobile bill through EIP (Equipment installment plan)

Login T – Mobile,
Go to the Billing > Equipment installment plan > View details > Click on Make payment > follow the all details carefully to do successfully EIP payment.

Pay T – Mobile bill through Mail or T – Mobile store

For Mail

You can send Check or MO (Money order) to the nearest address of T – Mobile store.
T - Mobile store address for Payment using Mail service

For T – Mobile store

To check nearest store to you find here

This article cover which is the best T - Mobile bill pay option for you, Which you have to select, and How pay bill Amount online and offline in T -Mobile in step by step guide.

If you are getting stuck to pay your T – Mobile bill, then comment in below. Don’t miss to share which are you using and best for you. Any another helps related to T –Mobile service and queary comment in below. This T –Mobile tips must be helping you, so share it.

Monday, September 1, 2014

How to know T – Mobile internet data plans and usage, minutes in your mobile

T –Mobile is giving awesome option to check internet mobile usage or balance in your T – Mobile account. Here in this you will find query on how to check balance on prepaid account or post paid account. You will know remaining minutes and roaming minutes count on during 30 days period will all the details.

T – Mobile internet data plans, usage and call minutes details

Check T – Mobile balance

To know the T – Mobile balance from your mobile,
For prepaid users, type #BAL# or #225# from dial pad and tap on call.
For postpaid users, type #999# from dial pad and tap on call.

Check T –Mobile data usage

For Data usage, Type #WEB# or #932# and call it.
Or you can also use alternate ways to check T – Mobile data usage. It’s T – Mobile account.

Steps to check data usage in T – Mobile account

Step 1: Go to the T – Mobile, login with username and password.
Step 2: Tap on view shared Usage Details, to check all the details on Data history and total usage.
Step 3: You can find minutes details by the click on Minutes column.
T-mobile data usage
T-mobile data usage
Image source (http://support.t-mobile.com/).

Check T – Mobile minutes

For prepaid account, Type #MIN# or #646# and tap on call.
For postpaid account, Type #999# and call on.

Check T – text messages

To check your message usage type #MSG# or #646# and Tap on call.

We are anticipation that, you have found correct T – Mobile internet data plans and usage, minutes in your mobile. If you have any problem to get T – Mobile usage then comment in blow comment box.