Tuesday, April 22, 2014

How to run windows Software on MAC OS – Run Windows App on MACBOOK or Apple desktop

Today’s most powerful Desktop OS Microsoft windows released millions of awesome useful apps. The Some of same types of useful MAC software not available in market due to compactable issues and OS values. But you can use any windows software on Mac OS in free. For that you have to install windows environment on your MAC OS. Today tens of useful windows environment are available to use any windows software on MAC OS machine.

Best software to run windows Software on MAC OS


Virtual Machine
Virtual Machine is one of the best to run any windows software on MAC machine OS. Virtual machine manages your windows application. Your windows software run inside virtual machine with background functionality. But you can see on MAC machine desktop.
To create virtual environment in your MAC machine then you have to download and install VirtualBox from here
Run windows Software on MAC Machine 2

Boot Camp
Boot Camp helps to run windows software on fully windows environment to move in MAC os you have to restart your PC and after selecting MAC environment you can use MAC os. At the end if you want to move MAC OS to windows that you must switch your OS at the time of booting process.
Run windows Software on MAC Machine

Wine
Wine works for all OS including windows, MAC, Linux. But Wine don’t integrate some windows software. Its biggest drawbacks of Wine. But wine is completely free for that you don’t need windows license and other investment.
Wine software and other get from here

Remote Desktop
Remote desktop connect your Mac machine and windows machine. To connect your machine you simply need IP address of target PC that you want to see in your desktop remotely.
Here Step by step guide is given on how to connect Windows PC remotely.

Useful: How to access your PC on android mobile remotely? [New one]
           Access multiple computers with different OS through the single PC

Credit : Howtogeek

Related Search for this post:
How to install any windows software on MAC PC?
How to use windows app on mac machine?
How to remove OS type issue on MAC machine?

If you have any problem and question than please comment in below comment box. and don’t miss to share this post with friend through the below sharing button.

Burn CD/DVD in Linux: Best CD/DVD making tools for Linux ubuntu

Friends, You finding best CD/DVD making software for your ubuntu Linux OS. Than this article is very useful for “bootable CD/DVD making software in free” me in past on behalf of my personal experience. CD/DVD making is very easy throughout this CD/DVD burning softwares. So don’t miss to install in your Linux Ubuntu Desktop or laptop.
Make CD-DVD burning software free for ubuntu linux

List of best CD/DVD burning or making software for ubuntu Linux

1. Brasero
Brasero is one of best CD/DVD burning software for ubuntu Linux.
Download Link for Brasero here
Brasero make it most powerful with some unique features and functionality. Using this software user can make your own text or audio, video CD/DVD quickly and easily.
Of you have any problem you can visit its official site from here

2. Gnome ISO Mounter
You can visit Official site from here
Download link for Gnome CD/DVD burning software from here

3. K3b 2.2
Through k3b you can make data cds, Audio cds, Video cds, mixed mode cds, CD/DVD burning, CD ripping, DVD copy and more.
K3b download link from here

Related Search For this post:
How to burn CD/DVD on Linux ubuntu?
Make CD/DVD on Linux,
How to make bootable CD/DVD from ubuntu Linux in free?

This all are free of cost for lifetime usage you don’t have to pay.
So don’t miss to share with your friends, if you face problem to burn CD/DVD on Linux/ubuntu that comment in below comment box.

Sunday, April 20, 2014

How to create restore point – Take backup of your windows 8 OS system

This article very use full for all including student, professional, and business users because this computer tricks saves your time and done your job easily without any problem at the time of format your system drive(c drive). Using this restore point you can install automatically your old installed software (before format your system) after install restore point before format your system. This tutorial guide on how to take restore point in latest windows OS – windows 8. For that you have to simply follow the below steps one by one.
Create System Restore point in windows 8

Note: You must have save your restore point location in physical drive in your system. (Don’t choose C drive)

Useful: Access your PC or Laptop in your android smart phone remotely.
           Windows 8.1 activation crack and patch full download

Step to take restore point in windows 8: make your whole system backup in windows 8


Step1
Search “Restore point” from start menu search field. More see in blow image,
As a result you can find search item under settings tab. Click on settings.
Create System Restore point in windows 8 step 1

Step 2
From there you can fine one of them search item in “System restore point” click on it.
Create System Restore point in windows 8 step 2

Step 3:
After hit on click you get “System property” window on your screen that given in below.
Create System Restore point in windows 8 step 3

Step 4:
Now you have to click on “Create” button under the “System Protection”. Now you see plain box with one text field. Through this you can give your unique restore point name for future use.


Create System Restore point in windows 8 step 4
Create System Restore point in windows 8 step 5
In restore point name you can give date and other detail as unique name.

Source: wikihow

Other search for this post:
Make restore point in windows 8 desktop or laptop
What is restore point? And how to use it in future?
Trouble shooting guide for restore point
Step by step guide on System restore point

Now my next article on “How to use restore point after format system?” State and don’t miss to visit this useful trick.
Don’t miss share this helping tutorial with your friends using below social sharing button. If you have any trouble related to this article please comment in below comment box.

Thursday, April 17, 2014

Access your computer remotely on android mobile phone or tablet: Google chrome updates

Friends, Some time you get thinking how to access my computer using mobile. My friends are always finding problem to solve other computer or accessing computer from remotely from anywhere and anytime. Now google Liston this problem and recently give wonder solution with chrome remote desktop.

Chrome Remote Desktop: Features – How to access Computer using mobile! Solved

Chrome Remote Desktop receives good rating (4.5) from user.

APK size : 2.1 MB

In below, displays some useful screen to get idea and benefits from these android apps.

From the first screen you get the whole idea how to access your computer from remotely on your android device screen. This apps automatically adjust your computer screen in your device screen might be mobile or tablet.
Access remote desktop using mobile phone - android

When you are accessing your remote computer you have to add your remote computer IP. At the end you can store whole setting for particular computer in other screen in below. In future you can reconnect your computer by simply taping on name of your computer give in below.
Save remote desktop on mobile phone - android

You can also set pin for connection so no one can access your computer from your mobile without pin number at connection time.
Pin verification to Access remote desktop using mobile phone - android

Note: These apps only run on android 4.0 and above. Update your mobile OS with latest android OS

You can save accessed computer for future use.
Useful: How to download APK file in your PC without android mobile from google play?           How to access my computer from remote place step by step guide?
Incoming Search for this post:
How to access my PC on mobile?
Remote access apps for android mobile
Best android app for remote connection.
How to manage multiple computers using mobile?

Finally thanks to google chrome gives very useful app for professional use. So don’t miss to share this post with our friends.
You can also comment on this stuff through the below comment box.

Settings For To Make Accessible My Computer As Remote Computer From Another Computer

Before to access your computer from remote computer you have to make to accessible from another place with setting up in local machine. This post helps to how to step by step guide for to make your local commuter accessible from different places. I hope you get your question of “How to make my local computer access from anywhere”, “Set up for connecting computer using network cable”, ”Configuration for remote access process”.

Useful: How to access multiple computer using single mouse and keyboard?
           Basic shortcut for computer to save time for all time. Prove yourself as professional.
           Basic for update windows 8 to 8.1

Step by Step guide for to make my PC remotely accessible from anywhere or remote computer

Step 1:
Go: Control Panel > System
Make your computer remotely Accessible step 1
Make your computer remotely Accessible Step 2
Step 2:
After completing step 1 you can see remote setting from left pan of the windows see in blow screen,
Remote Settings >
Make your computer remotely Accessible Step 11

Step 3:
After Clicking on remote setting you get small window with selected option “Don’t Allow connections to this computer”. Change it with “Allow connections from computer running any version of remote desktop”.
See in blow image,
Make your computer remotely Accessible

Now your job is done, from the remote size you can connect your local PC through the ip address.

Step 1
From the server side, Type “remote” in search at start Menu.
Click on “remote desktop connection”:
Make your computer remotely Accessible from remote side step 1

Step 2

From client side:

Type ip address of remote connection, you can get ip address from command prompt by typing “ipconfig” and hit enter.

From there ipv4 is your local computer ip address. Using this ip address you can connect your remote pc from server pc.
Get IP address for remotely Accessible from server side

From server Side:

Enter ip Address and click on connect button from there.
Make your computer remotely Accessible from remote side step 2

Related Search for this post:
Configuration for to make your computer remotely accessible
Basic setting in local machine as remote machine

Now your job is done.
Don’t miss to share this useful article with your friend through the blow sharing button. Also don’t miss comment if any problem.

Sunday, April 13, 2014

How to access multiple computer using single mouse and keyboard

Friends, this post is very useful when you are accessing multiple computer alone in your home, office or any other organization computers installed different OS like windows, Linux, Ubuntu, MAC, Debian, Fedora and Red hat. Many of friends can’t get solution of this “How to connect multiple computer using lAN”, ”Access multiple computer screen using single Hardware configuration like one mouse and keyboard”. To make this possible you simply follow the below steps sequentially. I implement at my friend’s home using this free software and some cabling process to connect your computers on single LAN.

Useful : Best Screen Sharing Apps to access your computer from remote PC

Steps to access multiple computer screen using single mouse or keyboard


Step 1:
You computer must be connected with single LAN (local Area Network).
Note: To create LAN you have to add all computers in same workgroup under the network sharing option.

Step 2:
Download synergy software. It’s available in premium and free version also. Synergy available for different OS like Windows (7/XP/Vista), MAC, Android, Ubuntu.

Download Click Here

Step 3:
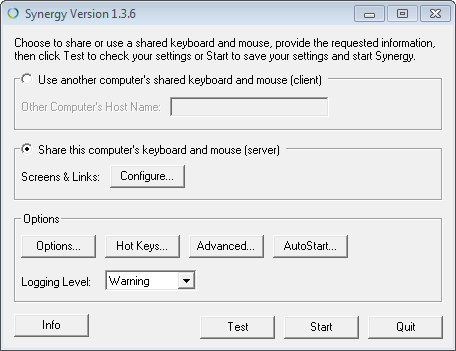
After installing this software in your main computer your screen looks like in below,
Share Computer Using single Mouse and Keyboard

Step 4:
Now install this software on all computers that you want to connect using single mouse and keyboard configuration.

Step 5:
Setting is different for mail computer has Mouse and Keyboard. We can say Admin Computer. Using Admin PC you can access and manage another computer from admin computer.
Select on main PC “Share this Computer’s keyboard and mouse (Server)

Step 6:
Another computer set “Use another computer’s shared keyboard and mouse (Client)”.

Step 7:
On serve or main computer set “hotkey” to swap access between other computers in serices by pressing this hot key. In this you have to submit details of another computer’s IP address or computer name.

Step 8:
Click on start button from setup. Your job is nicely done. Now you will be ready to access any computer by pressing hotkey do anything from admin computer.

Don’t miss to share this post with your friends, cause your friends struggle and find the same problem solution using below sharing button.

Other search for this post:
How to manage multiple computer screens from admin computer?
How connect more than one screen using single computer hardware.
Best computer connecting software inn free.

Please put your valuable speech in below comment box. if you have need for some help in your problem kindly say in below comment box.

Thursday, April 10, 2014

How To Block Website On Iphone Or ipad With iOS7 | Block Bad Site On Your Apple Device

Friends, If you are finding solution for how to block some specific website or unwanted website?, How to prevent your child from some bad website?. Than this post will help to do how block some website from your kids.

How to block Website on iPad or iPhone

Useful: Best website to learn from your home in free.
         : List of best companies over the world you must know

Steps to Block Unwanted Site in iPhone or iPad

Step 1: Open setting app button from your screen.

Step 2: Go with “General” option.

Step 3: Select enable this using “Enable Restrictions” with “Set Password Code”. You to enable this restriction when you aren’t enable pervious time.

Step 4: Now move on “Limit Adult Content” under the allowed website option. In this section you will automatically added by iPhone websites are visible. Now you have to add your website in the same category with selecting below options.

First move on “Add a Website” under the Never Allow section
Type full URL from your keypad submit website URL by tapping done from your Keypad.

Other Search for this post:
How to block website in iOS7?
Block website tutorial for iPad or iPhone.
Step by step guide for to block unwanted websites.
Don’t miss to share this article with your friend using below social sharing button.